What’s up my friend,
Hope you’re having an incredible week!
In this email, I want to explain to you why Dumbbell Lateral Raises SUCK.
• They waste time
• They leave results on the table
• They feel like complete & utter sh*t
Well, that’s kind of what I want to talk about – more specifically – I want to introduce you to the concept of “resistance profiles and strength profiles” – and we’ll use the lateral raise to do it.
So…
Resistance Profiles (RP) and Strength Profiles (SP).
• I’ll briefly explain what they are.
• I’ll show you a (lateral raise) comparison.
• I’ll give you a video walkthrough to try out in the gym at the end.
But first, what benefits can you expect from understanding RP’s and SP’s?
Exercise will feel less painful and (much) better.
You’ll get stronger quicker.
You’ll gain muscle quicker (you’re providing a stimulus to a greater ROM).
You’ll reduce injury risk (no bro-swinging or trying to use momentum).
You’ll achieve more by doing less – all while saving time in the gym.
Sounds good right? Damn straight it does!
Let’s dive in…

So what are “strength profiles” and “resistance profiles”?
We’ll keep this super simple, because definitions can get fancy & complex.
Strength Profile:
Where you are weak and strong in a movement.
Resistance Profile:
Where the exercise is heaviest and lightest.
Ideally, we want these two to match up. Heavy where you are strong. Light where you are weak. And by doing so, you achieve all the benefits mentioned earlier – but problem is, many exercises DO NOT match up…
ie. they are light where you are strong and heavy where you are weak.
We’ll do a deep dive on the lateral raise in this email, because it’s a simple example that’s easy to understand.
(or at least, easier than other examples!).
But you may be interested to see a few examples of profile mismatches:
(* BB = ”Barbell”. DB = ”Dumbbell”)
- DB Chest Flys
- BB or DB Squat
- BB or DB Deadlift
- Pulldowns and Pull Ups
- BB or DB Bench Press
- BB Shoulder Press
- BB or DB Rows
- Split Squats
Now lets go a bit deeper – enter the Lateral Raise.

Ever wondered why dumbbell lateral raises feel easy at the bottom and SUPER hard at the top?
It’s because the resistance profile SUCKS.
More specifically, it is very heavy where you are weak…
And light where you are strong (Ps. There’s an image below that will show you this)
See how that’s a complete and utter mismatch?
Because of this, you only challenge a small part of the range – and this remains true regardless or whether you choose to move through a “full“ range of motion or not.
So how do you improve this to make your workouts more efficient and your exercise more effective?
You have 2 options.
Option 1: You do full range raises – so you challenge the end range at the top where your delts are shortest… followed by partials where you challenge the bottom range where the delt is in a longer position.
But that’s 2 different exercises – which means more time spent in the gym (yawn).
Option 2: You substitute the dumbbells for cables and set the cable height just below your belly button so the exercise is heaviest where you are strongest, and drops off as you get weaker. Jackpot.
Here’s an illustration explaining what I mean,
(+ there’s a video later with instructions so you can try it out for yourself)…
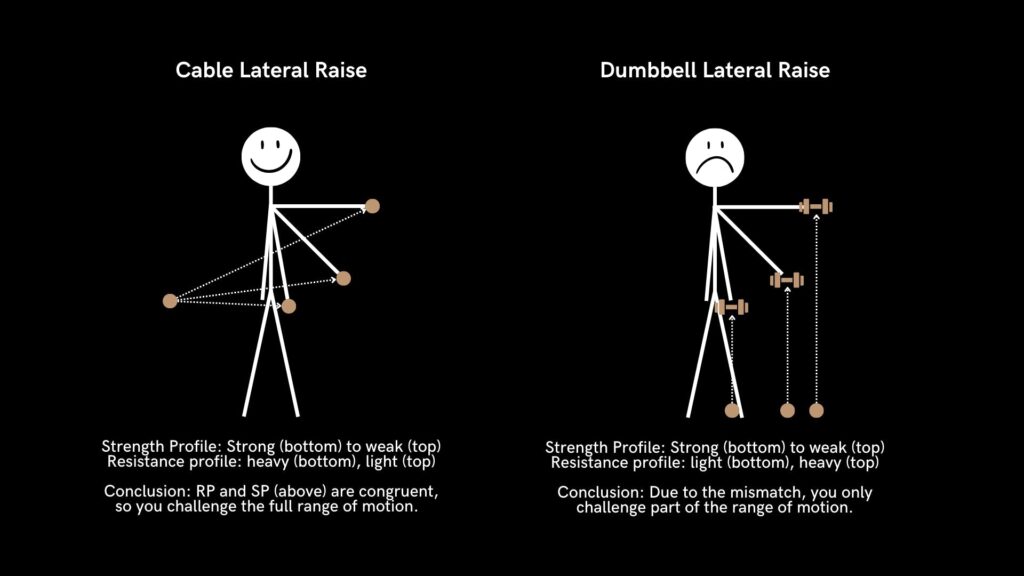
Ps. the image text is a bit small on mobile, so here’s what it says if you can’t see it:
DUMBBELL LATERAL RAISE
• Strength Profile: Strong (bottom) – Weak (Top)
• Resistance Profile: Light (bottom) – Strong (Top)
Conclusion: RP & SP are mismatched, so you do NOT challenge the full range of motion.
CABLE LATERAL RAISE
• Strength Profile: Strong (bottom) – Weak (Top)
• Resistance Profile: Heavy (bottom) – Light (Top)
Conclusion: RP & SP are in harmony, so you DO challenge the full range of motion.
See how the cable lateral raise is the SUPERIOR option (if you want a better resistance profile)?
Here’s how to set it up…

So to start, you’ll need a couple things to do this…
1/ A cable machine (duh)
2/ Exercise Cuffs (👈 this is a link with my recommendation)
And that’s pretty much it…
Got it? Great – let’s move on to set up and execution.
Everything in the video above is intentional. The direction of the cable, where the cuff is placed on my forearm, the position I’m standing in, the movement in my scapula (shoulder blade)…
So try to replicate EXACTLY what you see.
Here’s a step-by-step:
1/ Set cable at “bully button” height
2/ Attach the cuff JUST below your elbow
3/ Keep your arm / elbow bent to 90º
4/ Lift your arm up & out in an “arc” motion
5/ Let the weight drag you back to the start
ps. Did you notice I’m holding onto the machine with my other hand? This is to increase my support – and I’d recommend you do the same (it increases your ability to produce force… Ie. You’re sTrOnGeR).
Pps. If you want to keep challenge on your lateral delt, NOT let your arm externally rotate at the top of the movement. External rotation recruits the anterior delt and often happens as you start to fatigue.

Hope you found this useful?
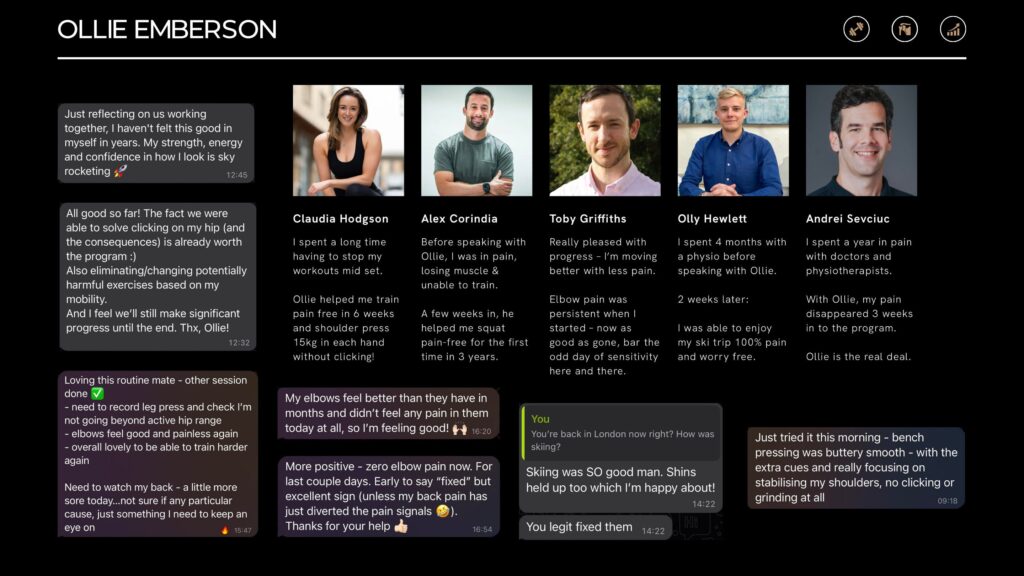
It’s this kind of exercise mechanics stuff that enabled me to 1/ fix my own shoulder injury from 2014 and 2/ help my clients get such incredible results remotely (10x faster than traditional rehab approaches).
Results like this 👇
Anyways, that’s it from me:
If you have any questions about what you’ve just read,
Ping me a message and I’ll get back to you 🙂
Till next time my friend,
— Ollie E. (The Jacked Investor)
ps. I appreciate you reading to the end. I want to show you another example of just how DEEP exercise can go (it’s a sneak peek into the “Exercise Library” I use with my 4-figure clients – $0)
🔻This is ONE exercise (Barbell Chest Press) of FIFTY in my exercise library🔻
https://www.notion.so/BB-Chest-Press-05ce5d4586f5498a94b1d4f0410645c9


